Android is well known for the full range of customization options it provides to its users, from using a third-party launcher to installing a better keyboard of your choice and implementing navigation gestures. The power-packed personalization feature has been android’s unique selling point since the beginning.
One of these features includes changing the APN settings of your phone. Tweaking the APN settings helps you get the best connectivity possible. You need to know the correct method to do so.
What is an APN?
APN can be treated as something that bridges the gap between the mobile device and the cellular network. APN stands for Access Point Name. APN identifies the packet data network and defines the type of service that is provided. It also handles the Multimedia Messaging services (MMS) and other settings for the proper functioning of your network. Your network reads these configurations to generate the IP address and connect to a secure gateway. We usually don’t need to know all these. We need to set up the correct settings, and the rest will be done on the carrier’s side.
Usually, we do not need to change the settings when we buy a smartphone because when you insert the SIM, the APN setting automatically gets configured. This happens because some of the android phones come with an extensive database of existing APN settings already set in the device, which may not be visible as only the active cellular network APN is evident or the system may push the settings in our equipment. We may also receive SMS configuration when we first connect to a web. You might need to manually enter APN settings when you are dealing with Custom ROM or Mobile Virtual Network Operator (MVNO).
How to change APN settings?
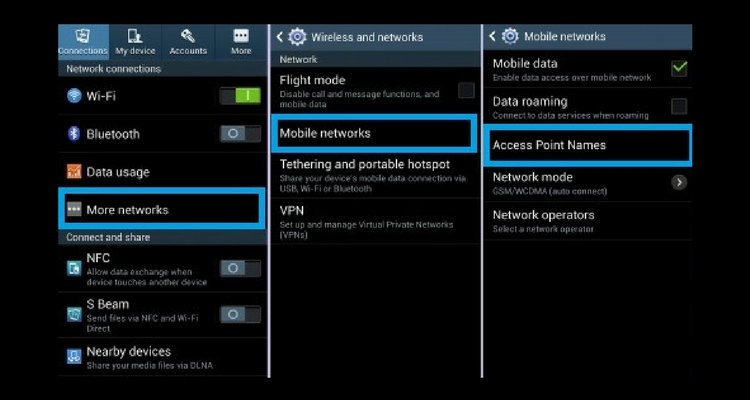
Go to Settings > SIM Cards & Mobile Networks > SIM card settings >Access Point Name.
The Location of the APN section may be different on different devices. It may be in connection and sharing or the Wireless Networks section. But once you reach the APN section, the settings are the same.
Do not change any current APN settings. Click on the plus sign ‘+’ with the “New APN” label on it. Enter the required configurations and click on the three-dot menu and then click on Save.
How to find the correct settings of the desired network?
To get the APN settings, you can Google search the network provider’s APN settings, or you may contact the customer support of the desired network for the following settings:
- Name: A user-defined name was given to the configuration. It does not affect connectivity. It is just used to identify the setting, among others.
- APN: The access point name is a short string of text, which is referred to as communication with the network.
- Proxy: Proxy is used to specify the HTTP proxy for all the web traffic through the connection. It is an optional field.
- Username and password: In sporadic cases, a username and password are required. It is usually left unfilled.
- Server: WAP Gateway Server is a feature that is not usually used in modern smartphones and devices. This field is generally left blank.
- MMSC: Details of Multimedia Messaging Service Centre to send and receive multimedia messages (MMS).
- MMS proxy/ MMS port: HTTP proxy details are used to communicate with Multimedia Messaging Service Centre to send and receive Multimedia Messaging Service (MMS).
- MMS Protocol: It specifies the protocol that your device needs for sending and receiving MMS messages. Usually, it is not modified.
- MCC/ MNC: It specifies the carrier network that the APN configuration should be used for. It stands for Mobile Country Code and Mobile Network Code.
- Authentication Type: It is used to send usernames and passwords to network providers. It is typically not utilized.
- APN Type: It specifies which type of data communication uses this APN configuration. Various sorts of communication may utilize multiple settings.
- APN Protocol: If your smartphone supports IPv6, then this helps you to select between IPv6, IPv4, or both. This can be separately assigned for both home and roaming networks.
- APN enable/disable: There can be several APN present on a device, so it helps us to allow which one to activate and which one to disable or enable
- Bearer: It is an optional field permitting you to avoid this APN arrangement dependent on the communication technology (example LTE, eHRPD) as of now being utilized.
- Mobile Virtual Network Operator Type /Value: Confine utilization of this APN to certain MVNOs (mobile network resellers) or supporter accounts.
Remember that many (however not all) transporters require separate APN settings for Internet data and MMS, and some may require diverse APN settings. So you may have to search accordingly for the parameters.
After you hit, save, then go back one screen and then tap on your new APN to activate it. You may lose data connection for a while when your device connects to the new network. In some cases, you might need to restart the device.
And that is it! Presently your device should work for calls, SMS, MMS, and data. Make sure to set up any Data Saver or to caution settings as your mobile phone may need to screen how much data you use and if you are exceeding the data limit.